
Hi you guys! So today i wanted to share a tutorial on how to make tile coasters:)

There easy to make and make beautiful gifts. I just got an order of 8 sets for Christmas gifts!!! I'm so excited to make them. So i hope you feel inspired to make them as well and bless somebody with a simple but yet meaningful gift that you made just for them :)
Okay so you will need the following:
4 tiles (you can get them at Lowe's or Home Depot).

Mod Podge and sponge brush

Acrylic Sealer

Stamps or pretty paper

StazOn Ink (i used black but that is up to you)

felt (your color preference)
glue gun
Sharpie
twine
embellishment (optional)
************
Okay so once you have all that your ready to start! Here are a few pictures that will show you how to make them step-by-step :)
Center your stamp on the tile and press firmly.
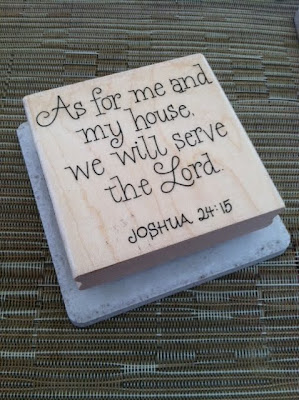
Lift it up carefully and the image will be on the tile. There's just one little detail. The tile isn't smooth so there will be small little places where the ink didn't get to. Go back and fill in the spaces with your sharpie :)

Just like this :)

TIP:Just to let you know, i ordered these acrylic stamps online and they were twice as cheap as normal stamps. You just need a stamp block but once you have that it works with any other acrylic stamp that you have!

Okay so do the same with the rest of the tiles! You can use the same stamp for all four of them or you can do different ones if you want :)


Okay so after the ink has dried (about 5-7 minutes), you can start applying the mod podge over the image that you stamped on your tile. Don't worry about trying to do this step perfect. I do gentle strokes and i love how it looks. If your using paper, apply a thin layer of mod podge on the tile, center your paper and make sure you have no bubbles! Press firmly and then do a another layer of mod podge over the paper. Wait about ten minutes to add another layer. I usually do about 3-5 layers of mod podge whether it's paper or ink!

At first it will look white but once the mod podge dries it'll be clear!

Okay so once you've applied all the mod podge layers that are needed and they are completely dried, you can go ahead and spray your tiles with your acrylic sealer! I do about 3 layers of these! Now, even after they are sprayed, the mod podge takes about a month to completely heal so make sure that you don't set anything hot on your tiles just yet because it will stick!!!
Then cut a piece of felt to cover the bottom and to give it a more clean look (this is where you use your glue gun). You don't have to do this step but i just like how it looks!

Use the twine to wrap it around the tiles, add a cute embellishment and then ta-da, your done!!! I love the way there turning out! I still got like 28 more to go but so far so good!!!!

I didn't make these today but i wanted to just show you how the paper coasters turn out!
I love how they look too, especially with so much pretty paper out there!!! Just use your imagination :)

Have fun creating!!! God Bless!!!
Link back to:


13 comments:
I LOVE THESE! These are adorable and i have never seen stamps like these...love them! These are such great gifts! Hey, and where is your followers box? It never shows up when I peek in. Is it on my end?
Thanks Jessica:)
These would make such a great gift! I would love for you to share with Blog Stalking Thursday at http://thecraftyblogstalker.blogspot.com/2011/10/blog-stalking-thursday-12.html
I'd love to!!!
how fabulous! they are simply wonderful... what a thoughtful gift! xo malia
ps happy new follower
awe thanks Malia :)
These are just great my friend!!!! I love them! I have been thinking about doing something like this forever..... shoot I might just have to get going on that!
-Jaime from crafty scrappy happy
Very nice! I was wondering if you could post the link where you got the stamps. Also I notice you used the tiles that were not slick. does this work on the slick ones also. And last question :o) Have you had any trouble with the dampness from glasses living a mark on these? Thank you!
you know what I'm so sorry! I bought these stamps a while back and the other day i was thinking of buying more and can't find the website ;/ Um i honestly haven't tried stamping the slick ones so not sure if it would work on them or not! and lastly no i have not. They work great, you just gotta wait about a month or even more for hot stuff! They wont get ruined if you put hot anthem before, but the coaster will stick to the bottom of your cup, lol! Hope that was helpful :) I was going to e-mail you but i couldn't find you info so i just responded here.
How beautiful... Love the choice of stamps...
Eva you are so creative! I really love these coasters! It would be a great gift these days! Well, I'm gonna follow you on my way out since it seems that I have many things to learn from you! Hope you drop by my blog when you get the chance!
Love, Olga
www.stardust-decorstyle.blogspot.com
On another website someone mentioned that things stick to the coaster because of the sealant. Do you have that issues with the Aleen's?
Post a Comment