
Hello :) Hope your weekend was blessed with your family! As for us, today was a busy, but fun day. We had church which was great! Worship was awesome. After that i had a bridal shower and my sweet hubby took the kids for me while i went to spend some time with the girls. It was fun :) I couldn't stay too long though because we went to the fair after that :) Sammy loved it! Him and daddy got on a few rides together. He got on the super slide and he loved it! His face was that of amazement. It was fun seeing them together. It brings so much joy to my heart :) Today was a true blessing.
So Friday i decorated some big glass canisters that i bought from Walmart for only $10. I loved how they came out! I had been looking for something big enough to put the 10 pounds of whole wheat flour and all-purpose flour that i buy. Since i make my own whole wheat bread and i love to bake i always have lots of flour at home. But i hated to see those ugly bags around the house. I'm an organized freak! I love to have everything clean and neat in my kitchen. So when i saw these glass canisters i knew i had to have them.
There was just one thing...they looked too plain! So i thought a little touch of vinyl would look pretty. So i whipped out my cricut and started on my project!
Applying vinyl is really easy. You just have to make sure it's centered and once you start sticking it on the surface, there is no going back. If you do, you'll probably mess up your project. I'm not saying it's impossible, but preferably get it right the first time.
In the pictures below you'll notice that i have the words separated and even upside down on the matt! LOL That was my own fault because i haven't used my machine in a while, therefore i didn't make sure to check the pressure on it and since it was low it didn't cut right. I didn't want the letters to be ruined so i pulled off the black vinyl sheet and took them off one by one, then re-arranged them back on the matt. When i made the second one i got it right so the letters stayed on the matt as i peeled back the rest of the vinyl sheet. If you need to fix or move your letters around, you can. Just make sure that when you pull back the vinyl from the matt, you bring the whole thing with you. I hope it makes sense. It's really easy, just think about the vinyl being like a sticker. You know how a sticker has a white back that isn't sticky? It's the same thing with vinyl. Once you have the design on your matt, your good to go.
I love vinyl. It comes in so many pretty colors and the best part is that it pretty much goes on anything! Hope you make something :) Here's a few pictures...
Materials:
Cricut Machine :)
vinyl
squeegee
cricut matt
masking tape
glass, wood, porcelain or whatever you want :)
Stick your vinyl on the matt.
 Have your glass or whatever your gonna use clean and ready to go.
 Cut the letters with your machine..sorry can't really see it.
 Once your letter are cut and the excess vinyl has been removed get ready for lifting.
 Cut masking tape thats bigger than your word.
 Stick it on top of your vinyl and press down with your squeegee. Press as hard as you can so that the vinyl sticks onto the masking tape.
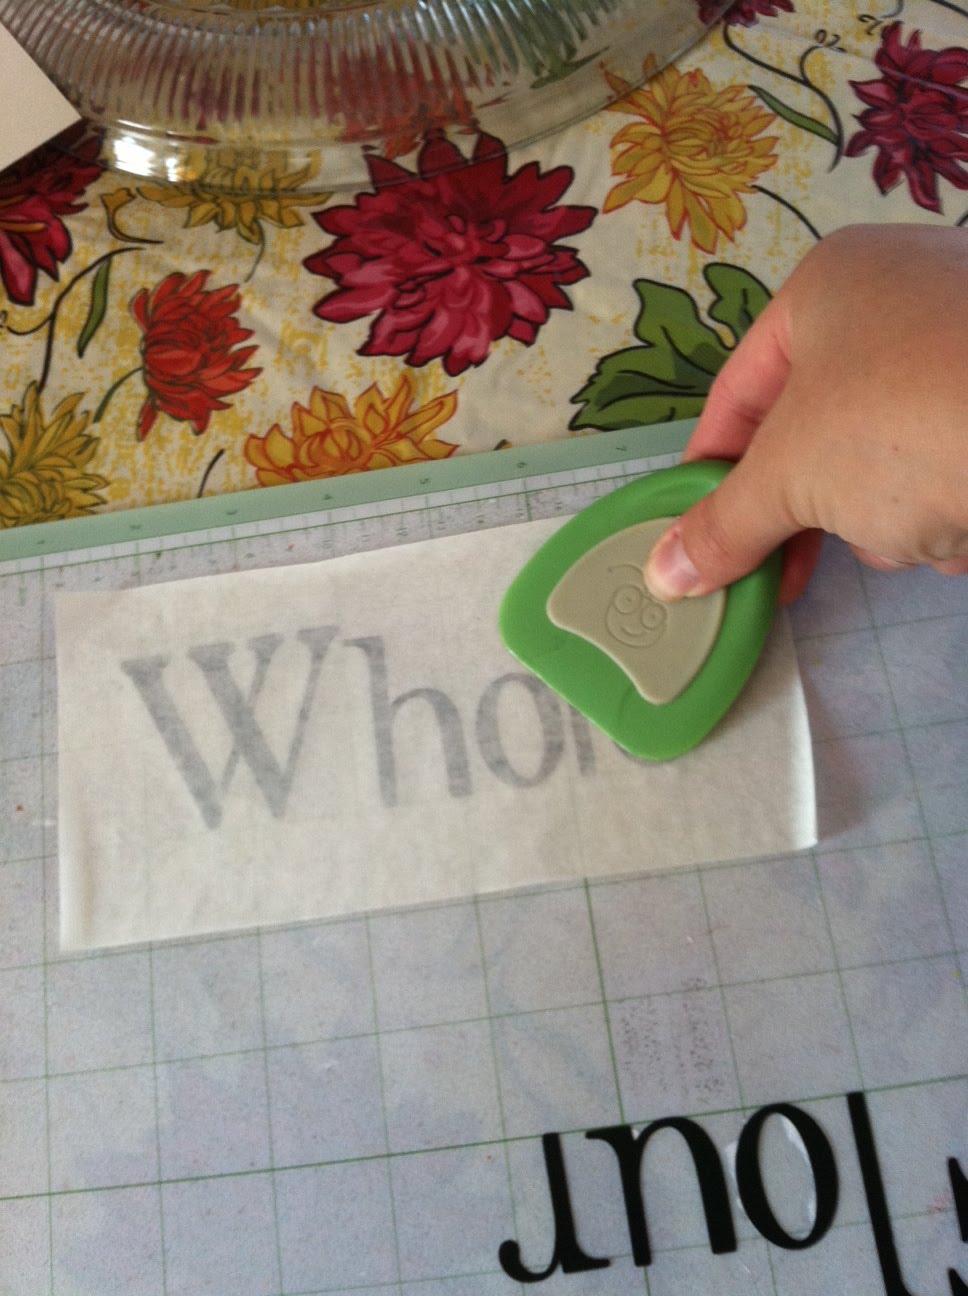 Once it's stuck, start peeling back making sure that the vinyl is coming along with it! Just the vinyl though. The white back part of the vinyl should stay on your matt!!!
 Just like that.
 Now center it onto your surface. I just eye balled it and it came out fine.
 Press down with your finger to make sure that the vinyl is sticking properly.
 Now just grab the corner of the masking tape and start peeling back slowly!!!
 Ta-Da!!! And there it is :) Not done yet but a very good start!
 Okay now its done! I love how they came out! My hubby thought they were nice too :) I made a little design on the sides, just to make it look prettier :)


 Delight yourself in the little things! God bless your guys' week :)
10 comments:
lovin those jars! I might have to do that! They turned out great!
oops mest up I seen this online and have these jars i might have do this :)
Thanks u guys. Have fun making something ;)
Wonderful tutorial. I just got a Silhouette machine for my birthday and can't wait to start applying the vinyl labels around the house.
thanks for sharing this I love this idea and will have to try it and now I know how come over and see what I shared at http://shopannies.blogspot.com
Where did you get your vinyl?
I'm an organized freak! I love to have everything clean and neat in my kitchen. So when i saw these glass canisters i knew i had to have them. vinyl cut lettering online
are these able to be washed?
Are these jars washable with this vinyl on there? If not what kind of vinyl do I need?
Post a Comment